Drop Down Menus CSS Drop Down Menu Pure CSS Dropdown Menu

Wednesday 5 July 2017

TIE Swarm - Death by a thousand cuts

The TIE Swarm is one of the first archetypes of this game, one that is instantly recognizable as Star Wars, a list that looks incredibly cool on the table and which is fun to play. I think it would be a great loss for this game not to have TIE swarms lying around. Alex Davy once said that the swarm is like "the shark of X-wing", you always have to be ready for it, but this is no longer the case. It has been steadily losing power since its inception, with the exception of the Crackshot FAQ.

I am turning the phrase "death by a thousand cuts" on its head, since I am speaking of the swarm's death. It has been trending downwards steadily for 8 waves with few intermissions, but I am ready to call it: At the present moment, the swarm is not only dead, but unfixable - without new mechanics or heavy-handed title fixes, it will never be a top tier list again. Top players might still be able to make it work, either by outplaying their opponents or getting favourable matchups during their tournament run, but they would still be running at a disadvantage most of the time.

This would be my first opinion piece. I am not a high-caliber swarm player, but I have been playing TIE swarms on and off since I first started playing the game, back in wave 2. I designed the Sigma swarm and flew it with good success in a wave 5 meta filled with Phantoms, Dash, Han and Decimators. I flew the Zeta Leader crackswarm during wave 8 and in the last tournament I've tried a bit of something new to see what it can do.

History


To talk about the swarm now, let's see briefly what made it great when it first appeared and what were its weaknesses

The key ship in this is the TIE Fighter, which in the beginning was the most efficient ship in the game point-wise, so it made sense to cram as much of them in a single list as possible. An 8-TIE swarm made sense, but that was not actually the first variant to be popular, because action economy was very rare and valuable. Rebels had Garven and Dutch, the Empire had Howlrunner. While 2 out of 4 Rebel ships would have double actions, the 7-Tie swarm would have almost 2 actions for 6 of them. On 2 dice, TL+focus is 1.87 expected hits, while 1 reroll + focus is 1.82, a difference of just 3%. Compare that to the Howlrunner gain, which is 21% more expected hits, so you can see what I mean by almost 2 actions.

So what did the list do? It demolished everything that was standing right in front of it. You had to fly the list in formation to a) benefit from Howlrunner and b) overlap as many arcs as possible, but the single TIE Fighter is extremely nimble, so the block as a whole moved fast and turned quickly where it fit.

There were a few problems with the list from the beginning, but some could be compensated by flying it well:
  • Most TIE Fighters were PS1, so you were guaranteed to lose a few before they fire over the course of the game.
  • You were always telegraphing via deployment which formation you were using (2x3, 3x2), which in turn telegraphed which lanes you would fit into and which you wouldn't. This is because you couldn't afford to lose formation too early, that would put you in danger of not having the Howlrunner reroll or friendly bumping.
  • Flying in formation was difficult and you had to keep as many open lanes as possible, so that it wouldn't be obvious which one you would eventually engage on. Did I mention that the pinwheel formation was discovered in wave 4? Wave 1&2 formations were two and a half bases wide.
  • It had difficulty killing high-agility opponents, which meant the mirror matchup was effectively a pillow fight. Fortunately, at the time nothing was powerful enough and had 3 agility at the same time. 
Then wave 4 hit like a truck and instead of the swarm there was the Phantom mini-swarm, but it's not the place to talk about that. Wave 5 brought about highly maneuverable turret ships (yay). Wave 7 brought Crackshot, but it was only with the arrival of the new core set that the crackswarm was discovered. An FAQ on Crackshot explained how it functions and it suddenly was after all other modifications. Effectively, it meant 6 extra damage in the first round for a swarm, so it could erase the biggest threat on the table (hopefully). The swarm was decent against the biggest threat of wave 8, triple jumpmasters. This suddenly changed when Dengaroo took the meta by force. With Rey, Dengar, Fenn Rau, TIE/sfs, the swarm never found a way to recover.


The thousand cuts


They're not really a thousand, but they're a lot and they add up.
  1. Power creep: The simplest to explain yet one that is slightly subtle. Power creep is now a factor. Although FFG did a good job overall, it's now been 11 waves and the differences now are evident.  Power creep in base statlines, but also in upgradeability.
  2. Automatic Damage: This type of mechanics has been around in the game since wave 2, but the options now are much more broad (Wampa, bombs with Sabine, Vader, etc.)
  3. High-accuracy Damage: Damage has never been as accurate as it is now. You can fly Rey and shoot 6 dice with TL and focus, or you could have Fenn with 5 dice TL+focus. Action economy has gone through the roof, gone are the days when 2 actions were an incredible feat. Now you can have two actions quite easily while bumping (K4 + expertise). In the past, the swarm had relied on bumping to get the job done on some higher PS enemies. Try to bump Dengar and shoot at it from range 1, see where that takes you! 
  4. No new tricks: While most other lists benefit from new upgrades all the time, the swarm remains stagnant. There is very little space for upgrades, since you can't afford to spend points on all the ships. Having crackshot on your swarm costs more than one TIE Fighter, and that's just 1pt itself, not to mention that the EPT is the only upgrade the TIEs have, and only on a small selection of pilots!
  5. Rigid deployment: Swarms have to deploy where multiple lanes are available, most of the time in one of the corners. If the opponent knows where to put the obstacles, it's probably down to one good corner. Even if the swarm doesn't have the lowest PS there's very few good spots to deploy so it's quite predictable.
  6. Rigid movements: It's not that TIE Fighters are less maneuverable now than they were before, it's that everything else is just as maneuverable or more, and other lists don't have to maintain formation!
  7. Low/Inexistent action economy: While everybody is swimming in actions, the swarm is stuck on focus and Howlrunner. 
  8. Reliance on range 1 mechanics: The entire swarm revolves around Howlrunner, for as long as she's still alive.
  9. Gradual loss of firepower: The swarm is losing teeth every round. It will lose a TIE Fighter per turn for the first few, with Howlrunner going down among the first. With the crackswarm, the initial engagement is big on firepower, but has a sharp fall afterwards. If the swarm could not do enough damage on the first volley it will just die. Ironically, the swarm used to be the list with the least variance. Now, running with only 2 actions, it's not guaranteed to have a brilliant alpha strike, so it's higher variance than many other things currently being run. You can't spend crackshot if your opponent has an extra evade result.
  10. Plethora of free actions: The swarm used to strive in bumpfests. Between several TIE Fighters getting unmodified shot vs. an X-wing, or vs. tokenless Soontir, it's clear that the swarm had the upper hand. But suddenly you can face Glitterstim, or Lone Wolf, or Rey (crew and pilot), Finn, even Countermeasures! There's plenty of ships that can eat a swarm up if they ever collide head-on!
  11. Dengar and Quickdraw: The two/four shots per turn with the capability of taking out 2 TIEs. Need I say anything more?
  12. Reinforce: The existence of reinforce in 100pt games brings down 2-dice ships another notch. I've played in Epic with crackshot before, being forced to crackshot a reinforce evade to get that single hit in is one of the more depressing things you can do in X-wing.
 

What FFG already tried to fix this


Chaser, Youngster, Scourge and Wampa. In order from most awful to actually great, these are the only things FFG has ever did for the lowly fighter (I don't believe crackshot was intentional).

Chaser is an attempt to fix the action economy, but it falls into the same pit as Night Beast. Any focus after the first is superfluous, and focus+evade is exactly what Nigh Beast can do as well. Definitely not enough as long as the TIE Fighter doesn't have a Target Lock. Between 3 Fighters with one having an evade, everybody would shoot the other Fighters.

Youngster was on the right path, give a bonus to many Fighters at once. It fails when you consider that Action: header cards are bad for action economy! It's silly to think that Expose would be a good idea when you don't actually have another action for a focus. Swarms with Rage also never picked up.

Scourge is a decent TIE Fighter, the extra dice is good, but it still has the other shortcomings of a TIE in a swarm.

Wampa is amazing, because it bypasses every possible defense at any point in the game, even if it's the last TIE on the board.

What FFG could do to fix it


I don't like doing houserules or rule modification proposals, upgrade cards etc., so I won't do that there. I would instead explore a bit the design space of what could be done.

I don't think FFG can slap a title and call it ok. There's too many problems and having 8 title fixes on the table at once (presuming a 0pt title) is silly. Moreover, fixing the TIE Fighter with the title is both admitting the existence of the power creep and making it worse.

So what could be the solution? I was thinking of squadron-level upgrades. It can manually enforce the types of ships (build lists only with TIEs), it can activate until the end of the game, there's plenty of points for a squadron-level upgrade (4-10 pts). It could fix action economy, and by unlimited range, replace the needs for formation as well. Or it could help the swarm deal more damage, or protect against one-hit kills. It doesn't have to fix everything (and it shouldn't), but bringing the swarm where not every matchup is an uphill challenge should be the goal.


Instead of a conclusion


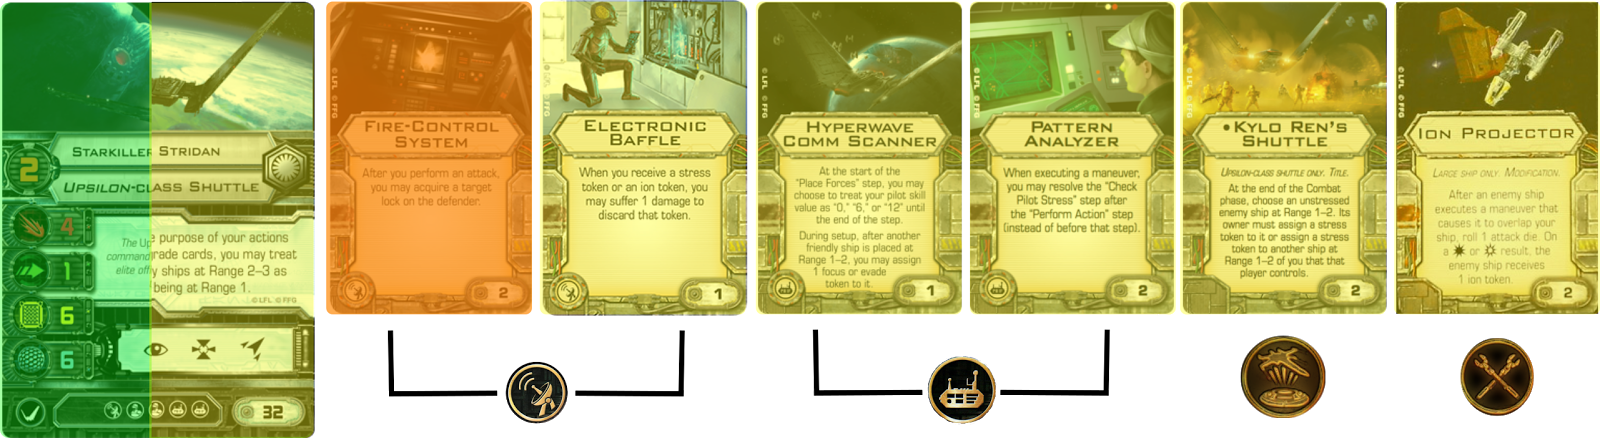
I would like to be wrong, I really would. Please tell me how I'm wrong :). Maybe I should be stubborn and play the swarm exclusively for a while? To give you a hint of what I've been trying to fly to make up for the downsides of the swarm in the current meta, here's this version:


It adds Kylo to the swarm, which seems to fix a lot of shortcomings, helps by blinding or damaging cockpits all over the place. It's a bit tricky to trigger kylo after turn 1, but there's a version with vader in its place that could do the trick. Wampa doesn't have synergy with Kylo but pushes damage through. Intelligence agent helps a lot against higher PS ships. It doesn't seem enough though.

Tuesday 20 June 2017

How to Tweak a List

There are numerous blog posts on list-building as a subject in general, even on the FFG main page ( Assemble your Squad), but I'd like to take a moment to discuss list tweaking/adjusting.

The process of tweaking comes after play-testing. The fact is you're never going to nail the fine details of a list from the get-go. You put it on the table and see how it fares. At the end of each game, you should be able to see which upgrades performed well, which were unnecessary and see what could be better. This requires good critical ability, you have to be able to differentiate from losses due to mistakes, the list underperforming or just dice outliers (notice I don't say bad dice).

I like to start with a single list and start categorizing the cards in the list. In general, I like to place pilots and upgrades in a list in four different categories, according to their role in the list:
  • Must-haves (red): These are cards I have designed the list around or just things I want to fly. These should remain in the list no matter what. (e.g. Soontir with Push the Limit)
  • Need-to-haves (orange): Cards that are not mandatory, but I would only give up on them if I really need the points for something else. These are usually utility cards that go well on ships but are not "glued" to them (e.g. Stealth Device on Soontir).
  • Toolbox cards (yellow): Cards that provide utility in my list but are not a mandatory or obvious pick (e.g. a Proton Rocket on the Inquisitor)
  • Filler cards (green): Cards that provide minor utility and are easily interchanged between versions of the build (e.g. 0pt EPTs).
This is not an indication of actual upgrade strength, but of the importance in the list and the rigidness of allocation of points (i.e. if I'm short on points I would never take out Palpatine in this list, but I would take out Fire-Control Systems if need be).


I'm going to break down my Euros list (write up and short explanation of the list here) to demonstrate the technique of adjusting and show how I've reached this final version. Let's first take a look at the final list and its cards:
  • Must-haves are an Upsilon shuttle with Palpatine (pulpsilon?), Sabacc with Title/Lightweight Frame, Backdraft with Title/Lightweight Frame. The pilots themselves are what I wanted to fly, that's why they are fixed. I could have included an upgrade to the Duchess, but the truth is I like Sabacc a lot, so it's a must-have
  • Need-to-haves are Fire-Control Systems. FCS is good on a TIE/sf because you can expect your previous target to be in one of the two arcs. It happens often that you are shooting at the same target and it helps a lot with offense. On the Upsilon it's equally important because there's 4 dice involved. If you use the FCS Target Lock once or twice per game I think it's enough. There are plenty of moments where the upsilon has no actions (stop, hard 1 turn, coordinate), so action economy on a 42-pts ship is pretty important.
  • Toolbox cards are Kylo Shuttle title and Snap Shot. Snap Shot is a very strong card, but it was not vital on the first list-building attempt. The shuttle title brings down Attanni lists, so it's a utility card that's tailored to the current meta.
  • Adaptability and Primed Thrusters are nice cards, but not at all important for this build. I could have easily replaced them with other  upgrades. I also marked the Starkiller Base Pilot as green because I would have upgraded him in a heartbeat if I could spare the points.


Now let's go through the process of tweaking the list. If we start with all the red cards, we have about 9pts to spare, 5pts without the orange cards. Here's a pool of cards that I have considered for this list with their importance.

For the Upsilon:
  • a 2pt ugrade to Major Stridan purely for PS, PS4 being above the Contracted Scouts. Also works pretty well for coordinate. In play-testing I have found that the shuttle doesn't go down as easily, and definitely not in the first round against Scouts, so it doesn't matter as much as I thought.
  • Electronic Baffle instead of FCS: good only if I really need the points, baffle allows multiple stops and is really good for maneuverability
  • Hyperwave Comm Scanner allows me to place the shuttle at PS12, my first deploy being Sabacc at PS6
  • Pattern Analyzer is similar in effect to baffle, I can stop and take an action, but I can't do it the following round as well.
  • Kylo Ren's shuttle takes down Attanni lists and jousters with bad greens (Defenders that are not Ryad)
  • Ion Projector locks down certain ships into an eternal bump with the shuttle
I started with Ion Projector, FCS and title on the shuttle, but dropped the Ion Projector because it was difficult to trigger, I wanted the shuttle to shoot most of the time rather than block as I would do with a lambda.

For Sabacc:
  • Snapshot increases the offense of Sabacc from potentially 5 dice to 8 (5+3). I found in play-testing that I could consistently get at least two triggers per game. A good snapshot at the right time can mean game over for the opponent.
  • Trick Shot increases offense to 6 dice max. In practice this is more difficult to trigger, especially the 6 dice range 1 shot.

For Backdraft:
  • 0-1pt EPTs, because I knew I wouldn't have the points for something more expensive. I took adaptability to take him over Dash and on par with Miranda.
  • FCS, no contender
  • A tech upgrade: Targeting Synchronizer allows Sabacc to fire a TL+focus shot, potentially keeping that TL for the shuttle as well. Pattern Analyzer allows a lot of shenanigans like 3-sloop focus so I can aim the rear arc at incoming ships.
In the end I went with Adaptability and Primed thrusters, but now I would choose Veteran Instincts. Primed Thrusters was useful in 2 games out of 9, and it wasn't game changing. Having PS9 would have helped a lot more.

So, in summary, these are the steps I would take from a pre-existing list to tweak it:
  1. Take the core of the list, mark it as red
  2. Generate a pool of interesting cards for the rest of the unoccupied slots (you can start with those from the first list), mark them as orange if they're needed a lot, yellow if they're useful and green if they're just around to fill up points.
  3. Play-test a few combinations and choose based on what works and what doesn't
So, is this the end? You could end up with a "final" list that you won't modify for months to come, but you're also likely to come up against a shifting meta. In that case, see if there are any toolbox cards that you can quickly swap out to account for that! 


Tuesday 13 June 2017

European Championships Write-up


If I was going to make it to one foreign X-wing tournament, it would be the European Championships. Being more busy than usual, I was unable to make it to the Yavin System Open (where we had 415 players last year), but I was instead able to make it to the Euros, taking place at the same location at roughly the same time as Yavin in 2016!

As a list I took what I was most familiar with, Upsilon with TIE s/f and Striker. I had been flying TIE s/f's with great success before lightweight frame, so I was both confident in their ability and in me flying them. I was also investigating a Tomax + Backdraft + extra list, but in tests it underperformed massively in the initial engagement and it collapsed afterwards. 

When taking an Upsilon Palp and a TIE s/f, you're left with about ~30 points for a 3rd ship, which could very well be Omega Leader (as the Mynocks fly it). Omega Leader is nice, but in this meta you have to be much more aggressive and attack-oriented. Pure sabacc does this by having 4 dice in the beginning of the game. Snap shot came about instead of my previous Ion projector and Trickshot, I think it was an extraordinary addition.


Let's do a quick breakdown of the list: I took Palpatine because he's still super good, I can easily tell when I'll be able to use him effectively. He saves Sabacc sometimes, he can get extend Backdraft's life or just provide extra firepower on the shuttle. In practice I've had one Palpatine miss every 2-3 games, at the Euros I was at 1 per game. Kylo Ren's Shuttle is one of the most important upgrades in the list, it decimates Attanni lists and also impedes jousters. Fire-Control System is mandatory for the shuttle, it's a pity not to get a dice modification for free on 4 dice. It's also at 1-2 uses per game, but I lost a game because I forgot it, so I know it's worth it. Lightweight Frame is a ridiculously good card, although it interferes a bit with Palpatine use. Primed Thrusters, for 1pt, allows you to 1-turn/3-sloop and barrel roll, or barrel-roll with stress via Coordinate.  Adaptability brings Backdraft to PS8, where there's a lot of action currently (mainly Miranda, good against Dash too). Snap Shot is the dark horse in this list, that gives it its name: Potential 8 dice coming from Sabacc in a single round. 3 dice with Palpatine against few modifiers (Attani helps here) and another range 1 shot. The Striker is maneuverable enough to make this work, as it can both cover great distances, do very tight turns, or just go over formations.


A summary of the "bag of tricks" of this list:
  • Snapshot with 3 dice and Palpatine, catches everyone by surprise
  • Kylo stress
  • Coordinate with shuttle
  • Coordinate a barrel roll while stressed on the TIE s/f
  • Using Palpatine on the lightweight frame extra dice, as a last resort if the rest of the roll went really badly
The plan generally is to tank with the shuttle a couple of shots while Sabacc flanks and Backdraft brings in the rear.  Sabacc hops around, the shuttle exits and comes back for another round, Backdraft turns to point his rear-arc where it needs to be.

One problem I've had with it is that I still don't master Sabacc as well as I should. I've had about 30-40 games with Striker variations, but it still feels like I'm driving with no brakes. I am unable to stall with him, I should have practiced some maneuvers for this. As such, I was forced to never stall with the shuttle in the opening maneuvers, I had to get everything right with minimal information from my opponent. I did mitigate this by deploying in an obvious "I'm going to bump the first round" formation, but I always 2-banked or 3-banked out of it. 


Overall I'm pretty proud of how the list performed. My losses could be attributed entirely to user error (getting Sabacc killed too early), which could have been avoided with more training. I would consider it an A-level list, one of the good things the Empire can offer at the moment.

Round 1 - Alban Trinchero (Switzerland)

"Quickdraw" (29)
Expertise (4)
Fire-Control System (2)
Pattern Analyzer (2)
Lightweight Frame (2)
Special Ops Training (0)

Colonel Vessery (35)
Crack Shot (1)
Twin Ion Engine Mk. II (1)
TIE/x7 (-2)

"Omega Leader" (21)
Juke (2)
Comm Relay (3)

Total: 100

My first round opponent was a good player (system opens, nationals goodies), placed very closely to me in the end. He began by slow-rolling Quickdraw and Vessery and drawing me to the obstacles in the center. Sabacc was not only too early but also clipped a debris field (sloppy play on my part, but it's hard to visualize 1-forward then 2-bank at a millimeter level). Sabacc died the following turn, after getting a snap shot on Omega Leader. The rest of my list focused on Vessery and managed to get it off the table. Unfortunately, I spent a focus too aggressively and didn't leave room for defense on Backdraft, losing 3 shields because of this. Backdraft went down quickly, but the shuttle outmaneuvered and bumped everyone. In the end, it was the shuttle against Omega Leader on 1 hull and Quickdraw on 2. Failing to get a FCS, I was tied between a full stop with no modifiers against Quickdraw versus a 1-forward with focus. The shuttle was playing a game of chicken with Quickdraw, with Omega Leader out of sight. I calculated there was no way he could evade my front arc so I did the 1-forward. Quickdraw was barely able to 3-bank and barrel roll out of arc and so ended any chance of my winning this game.

35-100 loss, which I almost avoided using only the shuttle!

Round 2 - Hey that's my fish!


Just kidding - there were significant delays so we played a few games of hey that's my fish!

Round 2 - Mikkel Lars Knudsen (Denmark)


Shara Bey (28)
Adaptability (0)
Jan Ors (2)
R2-D2 (4)
Alliance Overhaul (0)

Norra Wexley (29)
Push the Limit (3)
Kyle Katarn (3)
BB-8 (2)
Alliance Overhaul (0)

Jess Pava (25)
R3-A2 (2)
Primed Thrusters (1)
Integrated Astromech (0)

Total: 99

Round 2 started at about 16:30, people were already tired. This list was played in formation, with Norra supposedly exiting the formation at the last possible moment with BB-8 to flank. I was able to block Norra with my flanking Sabacc and get great shots on Jess Pava. Took out Jess and Norra, barely escaping with the shuttle. Then Shara was somehow activated and turned into a monster. It took a potshot at the shuttle, destroying it. It then entered Sabacc's range 1, received a snap shot and a range 1 shot with very little damage. What followed was two rounds of Sabacc getting snap shot and range 1 shots, but with very little damage, instead taking weapons failure (snapshot down to 1!). With Sabacc dieing horribly, Shara 2 pts more expensive than backdraft, I was on my way to my second loss. Backdraft couldn't do more than one damage per turn because of R2-D2 + Jan evade.  I disengaged, got around, then surprised him with a hard turn that got me 1 rit + 3dice with TL and focus on a 2 shield 1 hull Shara. 

100-68 win, definitely not as well as it should have gone after the initial exchanges, but a win.

Round 3 - Luis  A. Lozano Garcia (Spain)


 Wedge Antilles (29)
Swarm Tactics (2)
BB-8 (2)
Integrated Astromech (0)

Biggs Darklighter (25)
R4-D6 (1)
Integrated Astromech (0)

Captain Rex (14)

Jess Pava (25)
R2-D6 (1)
Crack Shot (1)
Integrated Astromech (0)

Total: 100

My opponent set his formation up to joust me, and we engaged with my perfect setup, Sabacc flanking with a good position to snap shot Jess Pava the following round. I was able to kill Biggs in the first round at range 3, which my opponent attributed to incredible dice.  The fact that I was shooting 11 dice with focus at a 6HP ship was not as relevant. 4 dice with focus + Palp, 3 dice focus and 4 dice with focus at range 3 against 3 dice with R4-D6 at range 3 is 5.15 average damage. Add to that a focus for one of the defense rolls, add that Palpatine counters R4-D6 and above average dice and Biggs goes poof. 

The next round I focused on Jess Pava, almost taking her out, while he put a lot of damage on backdraft. What followed was the best snapshot of the tournament. He had stressed captain Rex by 4k-ing into my blocking shuttle, so I thought he might bump Captain Rex again or at least I could get into a favourable position to snap shot Wedge by 2-slooping behind Rex. He 2-banked, which never fits if you're so close to a large base ship. 3 dice snapshot with Palpatine was Hit-Hit-Crit and he came up empty.


In the end it was a 100-21 win, he got half the shuttle. I think my opponent got flustered after his initial loss of Biggs, but I still consider that my list out-jousted his by a fair amount.

Round 4 - Adam Townsend (UK)


Asajj Ventress (37)
Attanni Mindlink (1)
Latts Razzi (2)
Black Market Slicer Tools (1)

Concord Dawn Veteran (22)
Attanni Mindlink (1)
Autothrusters (2)
Concord Dawn Protector (1)

Fenn Rau (28)
Attanni Mindlink (1)
Autothrusters (2)
Concord Dawn Protector (1)

Total: 99

My first Scum opponent of the tournament, and with an Attanni list at that! He didn't seem worried about the stress that much, but he came in for the joust and was surprised when it became difficult to escape with only green maneuvers! I lost the shuttle, but it fired twice pretty well. Sabacc was a monster and took out Assajj on his own, always flying behind her and getting a 5-dice range 1 shot.

100-42 win

Round 5 - Charlie ter Horst (Netherlands)


Contracted Scout (25)
Attanni Mindlink (1)
Extra Munitions (2)
Plasma Torpedoes (3)
Intelligence Agent (1)
R4 Agromech (2)
Guidance Chips (0)

Contracted Scout (25)
Attanni Mindlink (1)
Extra Munitions (2)
Plasma Torpedoes (3)
4-LOM (1)
R4 Agromech (2)
Guidance Chips (0)

Contracted Scout (25)
Attanni Mindlink (1)
Plasma Torpedoes (3)
Intelligence Agent (1)
R4 Agromech (2)
Guidance Chips (0)

Total: 100

As day 2 began, I was there 2 hours early and my smile dropped as I saw the pairings. Charlie is a friend from the Netherlands, I was there when he started playing, I did video commentary with him on a few dutch games, but recently he's taken it to the next level by going to Worlds 2016 and getting top 16! He's an extremely difficult opponent and he was flying a beast of a list, triple jumpmasters.   

We had already talked about my list, so he knew not to joust. He feigned a joust, but was able to get all the jumpmasters out of arc of the shuttle to get target locks. The last one did a 4 straight and a barrel roll, terribly close to Backdraft and to the edge. Seeing an opportunity, I barrel rolled closer and realised I had him pegged against the board edge!


I was pretty sure that he was going to go off the board, but having no better shots and an asteroid on the other side, I decided to turn the shuttle in its direction. The bump was incredibly close, we called a judge over to be sure (as none of us wanted to perform this delicate operation). It was in by less than 1mm!


Backdraft turned away and got some shots on the jumpmaster, but with little damage. As I was putting down dials, I noticed that the 2-hard turn was very likely to finally get his ship off the board if it cleared Backdraft. I squinted and I squinted and I went for it!


 Success!


With one ship off the board and very little damage taken (the lack of joust meant no torpedoes were fired), I was in a good spot points-wise but in a terrible position. Thankfully I was able to get enough points.

51-47 win, with a crux roll of 0 on 3 dice with TL saving a 1 hull Jumpmaster at the end. We were scrapping for time because of the lengthy bump-off-the-table-situation. A very atypical game, but I was able to squeeze this win!

Round 6 - Juan Riera Arriaga (Spain)


Miranda Doni (29)
Twin Laser Turret (6)
Extra Munitions (2)
Sabine Wren (2)
Thermal Detonators (3)
Cluster Mines (4)
Advanced SLAM (2)

Gold Squadron Pilot (18)
Twin Laser Turret (6)
R3-A2 (2)
BTL-A4 Y-Wing (0)

Biggs Darklighter (25)
R4-D6 (1)
Integrated Astromech (0)

Total: 100

My first Miranda matchup! As Bogdan, my sparring partner, mostly played Miranda, I was extremely confident in how to approach this game, especially since Miranda had no Homing missiles, only bombs. After a successful feint, the board looked like this:


Sabacc was out of arc of Biggs and the Stresshog, range 1 of TLT Miranda. Perfect! Biggs took a lot of damage, then died the following round when he 1-forwarded right into snapshot range.

After this 100-0 win, I was 5-1 and looking pretty good!

Round 7 - Harrison Sharp (UK)


Darth Vader (29)
Adaptability (0)
Advanced Targeting Computer (1)
TIE/x1 (0)

"Backdraft" (27)
Veteran Instincts (1)
Fire-Control System (2)
Lightweight Frame (2)
Special Ops Training (0)

Colonel Vessery (35)
Decoy (2)
Tractor Beam (1)
TIE/D (0)

Total: 100

After hurrying up with lunch and trying to see the expo in the 1h break, I got to the table a bit drowsy, having had no time to get coffee.

I got the idea of the list, he was flying it in formation, I made the error of believing he would not go for sabacc. He went after sabacc, tractored him into range 1 and killed him.  I then exchanged the shuttle for his Backdraft. With some clever maneuvering, primed thrusters and good dice I was able to destroy Vessery, but when Vader finally got in my back I had no chance to evade him.

70-100 loss clearly brought down by my misuse of Sabacc.

Round 8 - Pierre Buffiene (France)


Contracted Scout (25)
Attanni Mindlink (1)
Intelligence Agent (1)
Feedback Array (2)
Anti-Pursuit Lasers (2)

Contracted Scout (25)
Attanni Mindlink (1)
Extra Munitions (2)
Plasma Torpedoes (3)
R4 Agromech (2)
Guidance Chips (0)

Contracted Scout (25)
Attanni Mindlink (1)
Extra Munitions (2)
Proton Torpedoes (4)
Boba Fett (1)
R4 Agromech (2)
Guidance Chips (0)

Total: 99

A list similar to Charlie's, one that now I at least had a game against. I set up in a similar fashion and I was surprised to see he came in for the joust. The debris you see in the picture right next to the jumpmasters is mine, it  was meant to prevent him from escaping the shuttle if he came in jousting.

I got a good first engagement, good dice and, most important, the shuttle got a repeat shot on the outside jumpmaster when he was passing by. It was a 1mm in shot that we had to call the judge for, but it spelled disaster for my opponent.


100-21 win.

 Round 9 - Jonathan Kok (Netherlands)


Jan Ors (25)
Wired (1)
Twin Laser Turret (6)
Chewbacca (4)

Rey (45)
Expertise (4)
Finn (5)
Kanan Jarrus (3)
Scavenger Crane (2)
Smuggling Compartment (0)
Countermeasures (3)
Millennium Falcon (TFA) (1)

Total: 99

This was a matchup I was not particularly worried about, as I had played against Rey before, but not Expertise Rey. 

He slow-rolled it, so Sabacc came in a bit too early. I then thought he would 4-straight over the debris and moved the shuttle in, but he instead did a 1-turn to the left that landed him in range 1 of Backdraft. With Sabacc and Backdraft hurting, I misjudged a Sabacc maneuver and he clipped a debris field. With 2 hull remaining, he took a Direct Hit. 


36-100 loss, this game went south pretty quickly.


Hangar Bay

This was a more relaxed environment, and for the 3rd day I was not exactly focused on my game anymore. I had two wins and a spectacular loss to Carlo Tozzi, the Italian who won the Greek nationals last year. I was not only not expecting his list to hit so hard, but again I found myself with Sabacc not being where I needed him to be. I guess the skill ceiling for my list is higher.


Conclusion

After 9 rounds, I was 6-3 and 52nd. Not the best score, but not the worst either! Consider how tough the competition was (all the best players from Europe) and how little I was prepared compared to last year at Yavin, it went great!

I had great opponents, from all around Europe (3 UK, 3 Dutch, 2 Spaniards, 1 Swiss, 1 Danish, 1 French and 1 Italian counting the Hangar Bay), this was incredible! Thanks to all of my opponents for great games, looking forward to next year! Sorry to Charlie, the onus was on me to make it further in the tournament after stealing that win from you.

Thanks to all the guys and gals organizing this event,  despite a few bumps it was very well put together and it was a joy to participate!

I was super happy to fly my list, it was super fun to play for 3 days in a row. I'm not the best painter, but I had my dials matching the ships, I was pleased about that too. I got in a spectacular snap shot, a bump off the table and losses that I could easily explain with clear mistakes on my part. Not much more I could ask for.

Obligatory photo of the loot. Left hand side is the won loot: participation coin, Han Solo, Omega Ace and bump tokens, then there's stuff I received from my opponents (Han Solo, swarm tactics in spanish and a Danish bump token), on the right there's stuff I bought: template holder, Armada distance rulers, damage deck holders, 4 fantastic foil cards bought from the Italians.


Wednesday 14 December 2016

Armada Dice part II: Squadron to Ship

With wave 5 on the horizon, I want to put into context the stats for the squadron we already have. As everyone has seen, wave 3 has made a very powerful impact on the squadron game in Armada, because of the cheap activations, cheap squadron pushers and Bomber Command Center.

With the aid of a script I made, I can accurately calculate the damage based on clever ability usage. What does clever ability usage mean? It means not choosing the best order in which to resolve abilities, based on the initial roll

The aim of this blog post is two-fold: to show that there are clever paths to be taken when rerolling with simple rules of thumb that can be followed; to rank bombers based on their effectiveness taking into account the effect of Bomber Command Center and their cost.

X-wings

X-wings are the lowest efficiency bombers currently in the game, with only one red dice. Bomber Command Center in their case helps bring them in line with Y-wing in terms of expected damage. An X-wing with 2 Bomber Command Centers will do an average of 1.15 average damage, as opposed to a naked Y-wing which does 1. Of course, the efficiency is nowhere near, since the X-wing is 30% more expensive.

What about rerolls? With an X-wing and one BCC, you're only expected to reroll Accuracies and Blanks to get the best average result. In the diagram below, the center is the starting point, with the 5 possibilities of the red dice roll. On the next level, the red line represents the best choice, which is rerolling only in the case of the blank or accuracy.
What if we have 2 BCCs? Then the correct answer becomes rerolling all non-doubles on the first reroll, followed by blanks on the second roll. All in all, easy to remember!

To remember: While the X-wings have the lowest damage overall of all bombers, they benefit from having Bomber Command Center the most! 2BCCs increase their anti-ship damage by 50%!

Y-wings/TIE Bombers

Y-wings are the Rebel's cheap, no-fuss bomber option. 1 average damage with 1BCC, up to 1.25 and 1.44 with 2 BCCs! 44% damage increase is still very good! The TIE Bomber has of course the same damage output, but with fewer fleet points, so with greater overall efficiency in terms of anti-ship combat.

What about rerolls? Turns out this is more complicated. The average being 1, if you have a single reroll and you rolled a Hit, you have 2 options:
  • You are at average, be content with the result
  • Try your luck and go for the Hit/Crit
Both have the same average result, but the second option plays with variance a bit more, while the first option is safe!

If you have 2 rerolls, you can safely reroll Hits on the first reroll, followed by only-blank rerolls on the second reroll for safest and best average result!

Rule of thumb: No matter how many black dice rerolls you have, you can safely reroll hits on any reroll but the last! The last reroll is the one where you make the choice between safe and trying your luck! (but still with the same average result)

Firesprays

Almost not worth mentioning, since the rerolls are extremely intuitive. Anything that isn't a damage you can reroll. Overall they gain 30% damage from having 2BCCs.

B-wings 

With B-wings things get interesting. In terms of damage, they have the highest totals of any unnamed squadron and overall incredible efficiency.

As to rerolls, the priority seems to be the black dice. First make sure you have at least a Hit on that, then reroll the accuracy if you have rolled one. In the image below, all non-optimal choices and their respective consequences have been eliminated, so a red edge represents a correct choice. If there are two red edges, that means that both choices carry exactly the same weight, meaning they come out with the same average damage, no matter what.

Keyan is a special example (and now Ten Numb), because they're the only ones with 2 black dice and Keyan has a reroll capability built in!  Keyan benefits little, only 13% for a single BCC and 22.40% for 2 BCCs, but it takes him to an incredible 3 average damage!

His reroll rule of thumb is similar to Y-wings: Reroll Hits as long as you have rerolls left, otherwise reroll only blanks if you want to keep it safe!


Efficiency

So where does this take us? I have arranged the following table, where red columns are average damage, blue columns are benefits comparing to the vanilla scenario and white columns are efficiency, which I have defined as average damage per 10 points of squadron of that type. In this first table you can see how the X-wing gets to 1.15 average damage, trumping the vanilla Y-wing and TIE Bomber at 1 damage.


Default1BCC2BCC

AvgAvg/10pAvgBenefitAvg/10pAvgBenefitAvg/10p
1red (X-wing)0.750.581.0337.33%0.791.1553.33%0.88
1black (Y-wing/TIE Bomber)11.00/1.111.2525.00%1.25/1.391.4444.00%1.44/1.60
2blue1.50.831.8322.00%1.021.9530.00%1.08
1blue-black(B-wing)1.751.252.1422.29%1.532.3735.43%1.69
1blue-black + Toryn1.941.392.2214.43%1.592.4124.23%1.72
2black(w/o Keyan)212.4422.00%1.222.7236.00%1.36
2black(Keyan)2.51.252.8413.60%1.423.0622.40%1.53


The second table has efficiency calculated and sorted in descending order. The B-wing tops the list when taken with 2BCCs and is generally more efficient in all conditions.


Efficiency
B-wing + Toryn + 2BCC1.72
B-wing + 2BCC1.69
TIE Bomber + 2BCC1.6
B-wing + Toryn + BCC1.59
B-wing + BCC1.53
Keyan + 2BCC1.53
Y-wing + 2BCC1.44
Keyan + BCC1.42
TIE Bomber + BCC1.39

...

For B-wings, both 1BCC and 2BCC bring enough damage to be taken into consideration, although the first BCC brings the bigger boost in efficiency. I also considered B-wings with Toryn Farr nearby. As expected, Toryn Farr is weaker than a Bomber Command Center for an anti-ship of 1blue 1black. Of surprise is that the efficiency of an X-wing with 2 Bomber Command Centers is higher than that of a Vanilla Firespray!

To remember: Bomber Command Center transforms your mediocre bombers into decent bombers and good bombers into great bombers!

Cost of Flotillas 

But let's not get ahead of ourselves! Flotillas cost too, right? So you could argue that efficiency of squadrons has to take into account the cost of those flotillas with Bomber Command Center, 26 pts minimum for the Rebels and 31 pts for the Empire.

In the following table I have filled 134 points with a single squadron type and calculated the damage. Unrealistic, I know, but the point I'm going to make after this remains unchanged..

SquadronsPointsAvgEfficiency
Fleet of 13 Y-wings130131
13 Y-wings + BCC15616.251.04
13 Y-wings + 2 BCC18218.721.03
Fleet of 9 B-wings12615.751.25
Fleet of 9 B-wings + BCC15219.261.27
Fleet of 9 B-wings + 2 BCC17821.331.2
Fleet of 10 X-wings1307.50.58
Fleet of 10 X-wings + BCC15610.30.66
Fleet of 10 X-wings + 2 BCC18211.50.63
Fleet of 14 TIE Bombers126141.11
Fleet of 14 TIE Bombers + BCC15717.51.11
Fleet of 14 TIE Bombers + 2 BCC18820.161.07
Fleet of 7 Firesprays12610.50.83
Fleet of 7 Firesprays + BCC15712.810.82
Fleet of 7 Firesprays + 2 BCC18813.650.73


It seems that the efficiency is unchanged when taking this into account! So we end up paying the same per point of average damage as before! So what have we gained?
  • Activations, a flotilla is an extra activation on the battlefield
  • Points for squadrons beyond the 134 point mark, because flottillas can "carry their weight" by directly enhancing squadron damage
  • Decreasing variance of squadron rolls considerably: Even if the B-wings + flotillas generate the same average damage, the risk of blanks is removed
  • Extra anti-squadron fire
  • By having more damage per squadron, we concentrate firepower.
There's certainly things to lose:
  • Flotillas might be a liability since only one accuracy can ruin their day
  • More damage per squadron also means that you lose a lot of firepower for the same amount of HP lost. Individual squadrons are more important, because if you've only flotillas left, you can't do any damage with them. 

Conclusions 

This went a bit beyond a simple math article, since there are some lessons to be learned from this. Namely, that taking flotillas with BCC further increases your investment in bomber squadrons without increasing their efficiency, but eliminating variance. I admit I thought of flotillas with BCC as a damage multiplier, but it's more akin to a damage focusing element. You get more damage in per squadron activation and with less variation, this is incredibly valuable.

Correction: The second paragraph was a mess and I put 8 points for all my TIE Bomber calculations. Shows how much I play Empire, right?